6. Scale-out deployment
The modular deployment has split the three major components into dedicated servers, but still each machine hosts the only copy of each component. In this chapter, we will see how it’s possible to add high availability to the different components.
6.1 SQL Clustering
Let’s start with the SQL database. The way we can add resiliency to it is by leveraging SQL Clustering technologies. Thanks to this, we can make our VAC database fully redundant. We will add a second SQL server, and we will then join the existing one as a member of the cluster:

NOTE: we removed Cloud Connect and the Domain Controller to make the image more clear and focus on the VAC design. Remember that those two components as still there.
In this document, we will show explain the use case where the existing SQL Server 2016 standalone is upgraded to a SQL Server 2016 Always-On Availability Group. There are other possible design choices, depending on your requirements, SQL knowledge, licensing costs. VAC service ultimately needs to connect to a Microsoft SQL database, regardless where it is stored.
There are also several resources where we can learn how to build a SQL Cluster using Always-On Availability Groups, but we believe it’s convenient nonetheless to explain the needed steps:
-
install Failover Clustering feature into both servers;
-
open Failover Cluster Manager and click on Validate Configuration. You can validate both servers with one single operation:
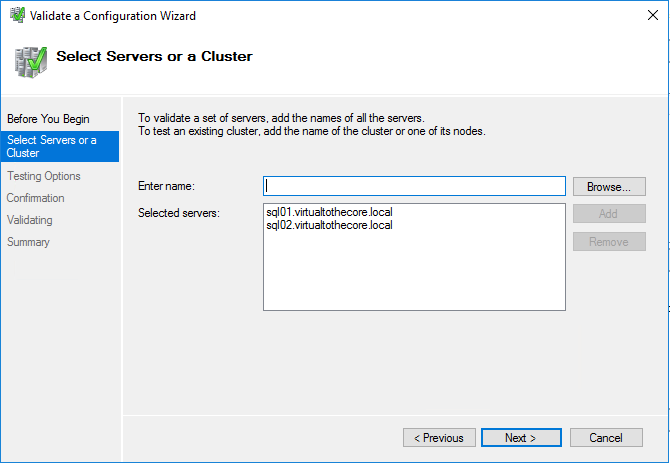
Select to run all tests and wait for the validation to be completed. There may be some warnings, but the overall result should be “Validated” for both nodes.
-
Choose the option “Create the cluster now using the validated nodes” and close the wizard, to start the new wizard that creates the cluster.
-
Give a name and an IP address to the cluster:
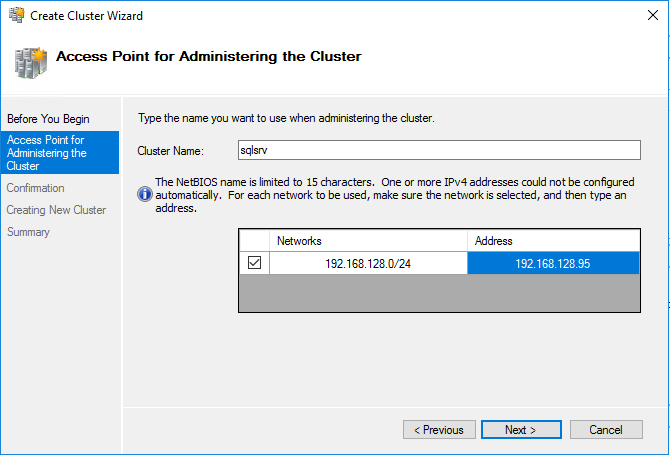
When the wizard is completed, the cluster is up and running, and for example we can already ping sqlsrv.
-
Right click on the cluster, select More Actions -> Configure Cluster Quorum Settings. Choose one of the options and complete the configuration.
-
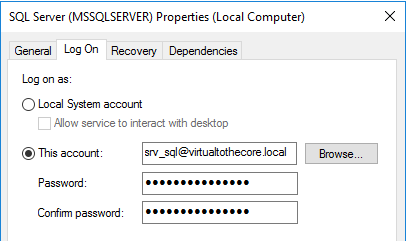
Create a new dedicated user for SQL Server, if you didn’t before. This account will be used to execute the service on both cluster nodes. I have created srv_sql.
-
Edit the SQL Service properties in sql01 (the server created for the modular deployment) and have it executed using the dedicated account we created on Step 6:
-
on sql02, run a new installation of a standalone SQL Server 2016. The options you need to care about are Instance root directory where we use a dedicated disk (E: in my case), Instance name where we set it as SQL02, and the service account for SQL Server Database Engine where we configure the same account we used in Step 7. Complete the installation.
-
On each node, open SQL Server Configuration Manager, select SQL Services, then SQL Server, and open its properties. There is a tab named AlwaysOn High Availability, check the box to enable the feature. Restart the service to apply the new configuration.
-
On each node, if you followed my example, we should have the folder E:\MSSQL13.SQL0X\MSSQL\DATA, where X is either 1 or 2 depending on the node. Now we need to pre-create the additional folder for the other node of the cluster, by creating an empty folder structure with the name of the other node: so, on sql01, we will create E:\MSSQL13.SQL02\MSSQL\DATA and vice versa. If you would have more nodes, each of them should have a folder for all the other nodes.
-
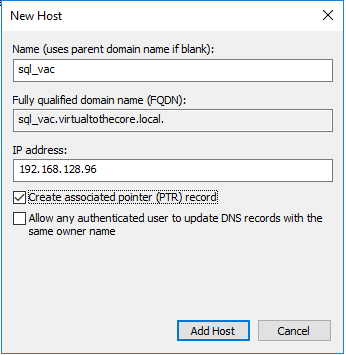
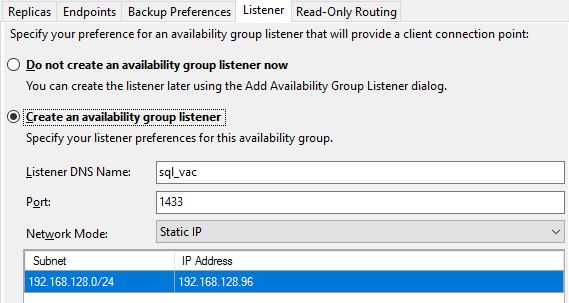
Create a Listener with FQDN and IP address in your local DNS server. This is the virtual name that will be used to publish the Availability Group:
-
In SQL Server Management Studio, verify that the VAC database has Full as its recovery model, and that at least one backup has been completed.
-
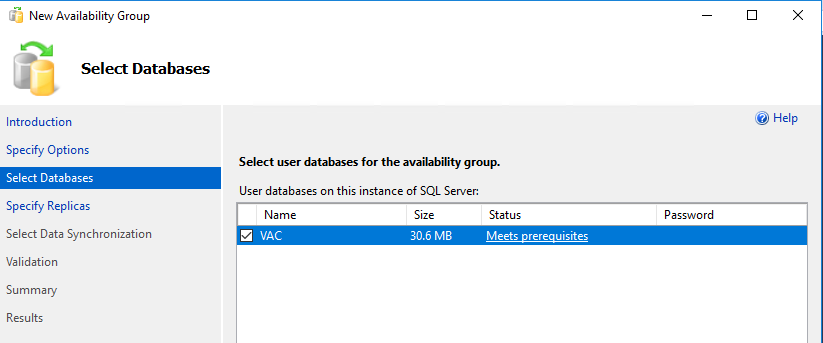
Still in SQL Server Management Studio, right click on Always On High Availability and start the wizard to create a new group, that we will call VAC. At this point our VAC database should satisfy all the prerequisites:
-
Add both nodes to the list of replicas, and enable automatic failover for both.
-
Open the endpoints tab and verify that SQL Server service account is the same for both.
-
In the Listener tab, configure it like it was created in step 11:
-
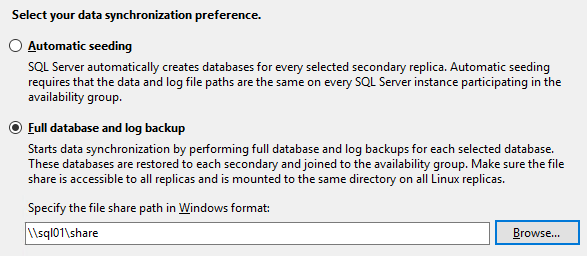
Create a simple file share in one of the servers that will be used for the initial replication, and configure it in the corresponding step of the wizard:
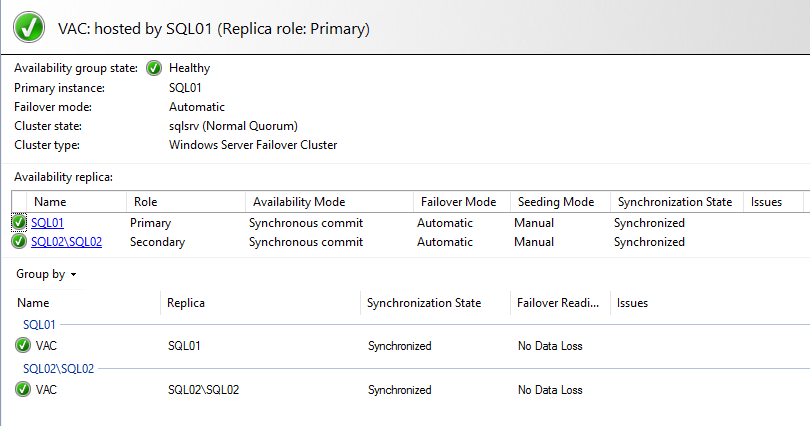
- Run the validation, check that everything is good, review one last time the summary of the options, and complete the creation of the group. You can then open the Dashboard to see that the group is up and running:
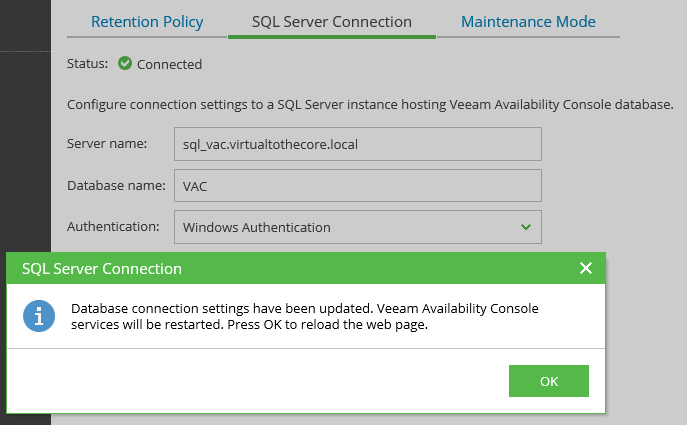
For the entire time of the migration, VAC has been connected to the single node, and the connection is still working. This is because the database is exposed from both nodes with their own DNS names, and via the listener. So, without any downtime, now we can go into VAC configuration and change the connection from the single SQL server to the new listener:
6.2 WebUI Load Balancing
As explained in chapter 2, WebUI is comprised of two websites both installed and controlled with IIS (Internet Information Service), the native Web Server of Microsoft Windows.
And exactly like other websites, the way to make them redundant is by leveraging web sites high availability technologies. Specifically, web site load balancing. This is achieved by deploying multiple WebUI installations, and by publishing them through a load balancer.
Let’s start from WebUI. We already have our dedicated WebUI server vacweb01.virtualtothecore.local. We then add a second server vacweb02.virtualtothecore.local so that the new environment will look like this:

Once the second server is deployed, we repeat the same installation procedure we described in Chapter 5 for the dedicated WebUI machine. Eventually, we will be able to connect to VAC using both URLs:


Once both WebUI servers are ready, we will configure the load balancer in front of them, so that users will only have to connect to the generic URL loaded into the load balancer itself.
It’s out of the scope of this document to discuss about the details of web load balancing: there are many technologies available in the market, and each have pro’s and con’s. One requisite is mandatory in the selection of the load balancer: since VAC uses HTTPS connection, our load balancer needs to support so called session persistence, also known as sticky sessions. It’s outside of the scope of this document to explain these concepts, but you can learn more reading detailed articles like this one: https://www.haproxy.com/blog/load-balancing-affinity-persistence-sticky-sessions-what-you-need-to-know/.
The same SSL certificate will be installed into both WebUI, referring to the virtual IP and DNS name of the web interface, as it will be reached from outside. In this way the connection to each of the web servers will be exactly the same, and via load balancing we will be able to distribute the load across the two servers.
6.3 VAC Service redundancy
VAC Service cannot officially be deployed into multiple copies inside the same installation. Even if in our Labs we tested the use of Microsoft clustering for creating a highly available setup of the VAC service, we believe that this solution is overly complex, with not enough additional benefit to justify it.
As we explained and demonstrated in chapter 5, the VAC service is virtually stateless, it has no data in it, and can easily be rebuilt from scratch and connected to both the backend SQL database and the frontend WebUI(s). for this reason, we suggest to improve the redundancy of the VAC service by replicating the virtual machine where VAC server is executed. This is the fastest method as the cloned server is identical to the original one, so we would just need to power it on to restore operations. Other methods like using a new VAC server may be slower because of the required reconfigurations (WebUI, managed cloud connect server).
